Sunday 20 December 2009
ERS Settings Required
In the vendor master, make sure the 3 ERS boxes are checked off in the
purchasing data section: GR-based inv verif, AutoEvalGRSetmt Del, &
AutoEvalGRSetmt Ret.
In the PO, make sure the following boxes are checked off: GR, IR,
GR-basedIV, & ERS. GR-basedIV has to be checked off in order for the ERS
program to create the invoice.
In the info record, check off GR-basedIV.
Yes, you need to set up message output but you don't need to print the
output. We set it up for company code and not by vendor and company code.
We set it up with a dispatch time of 3 so it won't print unless we do an
explicit request.
When we have a 102 movement, ERS creates a credit memo when the ERS program
is run.
ERS Invoice Posted 2 times. How to prevent it
Our config is OK, we have "check double invoice on" and zero tolerance. The
root cause of the problem is deeper than that.
Table EKRS stores ERS items which have been goods receipted and are to be
invoiced.
When an ERS is run it reads table EKRS to see what to invoice but does not
lock the items to be processed.
Therefore, if another ERS starts with overlapping selections ( as in my case
)while the first one is still running everything gets posted twice. As the
performance of ERS (or any SAP transaction involving purchasing documents
with history) is so appalling this can easily happen.
OSS note 175827 explains the cause and offers the helpful advice "make sure
you don't run two at once" i.e. make sure your users never make mistakes.
SAP never make mistakes so they have little tolerance for those of us that
do.
Note 216997 gives you a little program to see how many items got posted
twice.
Another note explains that if you try to manually reverse items posted twice
and accidentally put a wrong number in and reverse one only posted once it
has all sorts of dire consequences most notably that EKRS does not get
updated so you can't re-invoice it again.
None of the notes actually offer a solution. In the 564 "program error" OSS
notes relating to ERS I noticed references to user exits. I am going to see
if I can use one of those to lock the relevant EKRS entries for a running
ERS job.
Saturday 19 December 2009

Account / Transaction key for Services
I am maintaining a condition for services. IMG MM - External Services Management -> Maintain Condition for services . Here i have created condition type and maintained in conditions: Schemas for services. But i cannot create Account key / Transaction key here. Can anyone guide me where i can create account / transaction key for external service management.
Account / Transaction key can be maintained for normal PO conditions in IMG MM -> Purchasing -> Conditions -> Price Determination but those account keys are not appearing in External Service Management calculation schema for services.
You can Maintain a transaction event key in T687 table
Using OMGH the transaction key can be maintained but it doesnt appears in Service Management calculation schema.
Using SM30 V_T687 transaction key is maintained and it is accepted in Service Management caculation schem but now i have to assign GL accoutn to it.
Tuesday 15 December 2009
How to add an attachment to a Purchase Order in SAP?
You can attach manually any document to PO without using Document Management System ( DMS ) in SAP 4.6C.
But you cannot attach document while you create PO in T/Code ME21N
Save you PO ( ME21N ) and again open with change ( ME22N ) then you can attach document through Service for Object button. Service for Object button available down side of Command screen ( in your PO screen ME22N )
Click your Service Object button -> Create -> Create attachment
then select your window directory ( which file you need to attach) select your file Now your system shows message Service "Create attachment" is started.
Save again your PO. You can see (open) your attachment in same field ( Service for Object ) select and Create and check attachment list. You can attach as many document in your PO.
Note: This is only information for internal or you can print separately this document for sending to vendor ( fax ) System will not print automatically along PO print out.
How to deactivate ERS output??
Please refer to the column Information Text, which is stated that " ...
No message was found for....". Please double click on this for further
information about this and the error message should be M8 446:
You can change the attribute of the message thru path in customizing :
Materials Management, Logistic Invoice Verification => Define
attributes of Systems Messages'. Here you can use the pull down menu
and set the message to "switch off message" this can be set up for
individual users or for all users.
In this step, you can define the category of message received by
individual users for certain messages in Invoice Verification. This
allows you determine whether a user receives a message as an indication
of:
- Information
- Warning
- Error
- Or whether no message should be issued at all: message switched off
Wednesday 9 December 2009
Address Number and Address
Maintain Addresses >> tcode >> MEAN
Table for Addresses >> ADRC
WE CAN SEE THIS IN MENU TREE IN MASTER and under MESSAGES
Table TWLAD has the address number for the storage location.
In our PO SAPscript, it picks the Storage location address over division address.
when you create a PO make sure you maintain both the plant and the storage location and the delivery address of the storage locations should come instead of the plant delivery address.
==============================================
Addresses in Purchasing Linked to Central SAP Address Management
Description
As of Release 4.0A, all addresses needed in purchasing documents (e.g. vendor address and delivery address) are administered using the central address management functionality of the SAP System.
As a result, you can store more data than previously in all purchasing documents (e.g. several telephone and fax numbers, e-mail addresses, or information on districts or parts of building complexes).
Storage location address
You now have the option of storing one or more addresses for the level of the storage location too. If you maintain addresses for storage locations, the latter are suggested by the system as the delivery address (i.e. they appear as default values) when a purchase order is created.
When searching for the default address, the system proceeds as follows:
If just one storage location address has been maintained, it is taken as the default address
If no storage location address has been maintained, the plant address is taken as the default address.
If several storage location addresses have been maintained, the first of them is taken as the default address.
A new user exit (EXIT_SAPLMMDA_001) is available for the purpose of differentiated selection, allowing you to specify yourself (if desired) which address you wish to use.
Delivery address in the purchase requisition
As of Release 4.0A, you can maintain a delivery address for each item of a purchase requisition. There are three alternative ways of doing this:
Manual maintenance
Selection of an address from the central address management facility
(in the Purchasing menu under "Master data -> Delivery addresses")
Entry of a vendor or customer number, on the basis of which the system derives the relevant address.
Vendor address in purchasing documents
One-time vendors are also included in the central address management facility.
Previously, vendor addresses were only displayed in purchasing documents. As of 4.0A they can also be changed.
Change system parameters in customizing
User exit EXIT_SAPLMMDA_001:
A communication structure is passed on to the user exit. You can extend the former.
For example, if you wish to determine that materials of the group "Construction materials" are to be delivered to a particular location, you must include the field "Material group" in the communication structure.
For more on this topic, please also refer to the release note
Changes in Address Management.
Monday 7 December 2009
Sunday 6 December 2009
REQUIREMENTS FOR CONDITIONS
VOFM Maintain Requirements and Functions (output requirements, pricing formulas, etc)
MAINTENANCE VIEW FOR TABLE
Goto SE11,
enter your table name.
Then goto Utilities\TableMaintenance Generator double click on the textbox of Overview screen.
Just wait and the layout editor will be open.
make any changes in the column names or width.
or
Go to SE55 click on change button or in SE11-> utilities->maintenance. Click on "Expert mode". Leave the first two check box that is Include renew. Tick rest check box and press enter. It will regenerate you maintenance screen.
Saturday 5 December 2009
Friday 4 December 2009
Sending P.O. By Mail To Vendor
Is there any standard programm for sending P.O.'s by e-mail to vendor's email-id?
You need to do some configuration for this.
- Goto NACE .
- Select EF and click on OUTPUT TYPES.
- Then select Output Type NEU and click on processing routines .
- In that you have to add a new entry - medium 5 .
- Then you need to assign a program, form routine and form.
- You can use the standard program i.e. SAPFM06P, FORM routine is always ENTRY_NEU and standard MEDRUCK.
- Then in PARTNER FUNCTION you need to add a new entry : medium - 5 and function - VN .
- For subject of the mail goto Mail Title and Texts. In title give PO No. &EKKO-EBELN& .
- Under General data -> Replacement of text symbols give programm as SAPMM06E and Form Routine as
TEXT_SYMBOL_REPLACE .
- Now the subject will be PO No. 1800004202.
- You need to maintain your email id in tcode SU01 and also the vendor's email id.
- Now while creating a new purchase order , change the medium to External Send .
- Then goto Communication Method and select CS01 . ALSO make sure that the Cover Page Text has value PO No. &EKKO-EBELN& .
- Goto tcode ME9F .
- Execute.
- Select the checkbox and click on Output Message.
- You will get a message MAII 00000000000001 generated .
If the BASIS guys have made the necessary configuration for sending mail then the mail will go .
You can see the status in tcode SOST.
If you want to use a z-programm and z-form then you need add the functions used in standard programm SAPFM06P for generating mail in your z-programm.
Wednesday 2 December 2009
SAP Production Planning Overview
Check out this SlideShare Presentation:
SAP Production Planning Overview
View more presentations from Rupesh Brahmankar.
SAP Archiving
Check out this SlideShare Presentation:
SAP Archiving
View more presentations from Phil Gleadhill.
Tuesday 1 December 2009
Monday 30 November 2009
PO Email - Subject with PO Number and Message Body
To make the PO number appear in the email subject please do the
following.
In configuration: Materials Management -> Purchasing -> Messages ->
Output Control -> Message Types -> Define Message Types for Purchase
Order -> Maintain message types for PO -> highlight your output type ->
select mail title and texts and enter the following in the title line:
PO number &EKKO-EBELN&
Then, double click on your PO output type to advance to the General data
tab. At the bottom of this tab there is an area called 'Replacement of
text symbols'. In the Program field, enter SAPMM06E, then in the FORM
routine field, enter: TEXT_SYMBOL_REPLACE. THIS SHOULD BE IN THE TAB EMAIL.
To Create Body of Message. GO to Tcode SODIS. Under Document Folder create a document named "Email" (or any other name) and write whaterver you want to appear in the body of the email message. Then go to above MAIL tab in output setting enter the document name EMAIL in the field DOCUMENT and Save it.
THat is all. Now when you send PO from SAP to Vendor to his email Id, the email will have the following:
1 . PO in PDF format.
2. Subject will have PO Number
3. Body of the message will have whatever you had typed under the document EMAIL in tcode SODIS.
Sunday 29 November 2009
Thursday 26 November 2009
Friday 20 November 2009
Thursday 29 October 2009
SAP WebSerives using BAPI
[end]
This message is for the designated recipient only and may contain privileged, proprietary, or otherwise private information. If you have received it in error, please notify the sender immediately and delete the original. Any other use of the email by you is prohibited.
CIN, PR Release
[end]
This message is for the designated recipient only and may contain privileged, proprietary, or otherwise private information. If you have received it in error, please notify the sender immediately and delete the original. Any other use of the email by you is prohibited.
SAP Links
BAPI & PR RELEASE
[end]
This message is for the designated recipient only and may contain privileged, proprietary, or otherwise private information. If you have received it in error, please notify the sender immediately and delete the original. Any other use of the email by you is prohibited.
Online Purchase request (PR) Approval Application Using Blackberry
[end]
This message is for the designated recipient only and may contain privileged, proprietary, or otherwise private information. If you have received it in error, please notify the sender immediately and delete the original. Any other use of the email by you is prohibited.
Wednesday 28 October 2009
SAP® Business Workflow
SAP® Business Workflow
Notification of Work Items via e-Mail
By Suresh Kumar Parvathaneni
SAP provides us with a facility of notifying the user via the email address of your choice when there are any pending work items in the SAP Inbox..
1. Go to Transaction SO13.

2. Click on Automatic Forwarding tab.

3. Click on Create icon .

4. Enter the details in the above screen.

5. Click ENTER to complete the entries.
6. Now the notification would be received at the provided email address if there are any pending work items in the inbox.
Tuesday 27 October 2009
Setting up simple Release Procedure f...
Setting up simple Release Procedure for Purchase Requisitions
Release Procedures (approval) can be used for Purchase Requisitions (PR), Purchase Orders (PO), RFQ's, Outline Agreements and Service Entry Sheets. The principle is exactly the same for all. If you can master one, you will know them all.
Lets set up release procedures for PR for the following example:
Our company have got 2 plants: Plant 3100 (London) and plant 3600 (New York).
- For New York (plant 3100), if PR item value is between 0 - 1000 dollars, then PR needs to be released by one person (person B)
- For New York (plant 3100), if PR item value is bigger than 1000 dollars, then PR needs to be released by two people (first by person B, then person C)
- For London (plant 3600), if PR item value is bigger than 1000 dollars, then PR needs to be released by two people (first by person A, then person C).
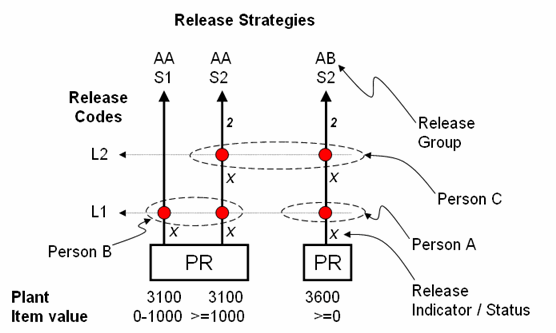
Key terminology:
- Release Codes - The different levels that the approval will go through.
- Release Groups - Grouping of strategies.
- Release Strategy - Unique, set of condition, sequence and levels of releases. Every line in diagram is a Strategy (so we have 3).
- Release Indicator / Status - The status of PR as it moves through the strategy. Example 'Block' (can't create PO yet) or 'Final Release' (can create PO from PR)
- Create Characteristics & link to comm. structre (CEBAN for PR)
- Create Class & link to characteristic
- Create Release Groups & link to class
- Create Release Codes
- Release Indicator
- Set up strategies
- Strategies & Codes
- Prerequeirements
- Status
- Assign values for strategies - Set overall / item for doc type (PR only)
- Create and allocate autorisation profiles
Create Characteristics & link to communication structure (CEBAN for PR)
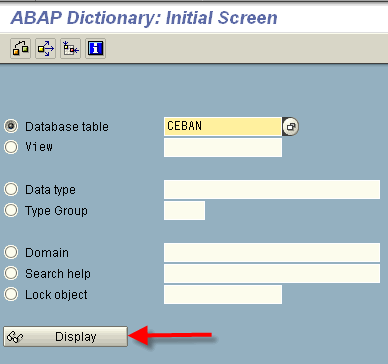
Here we define which fields are used to determine the strategy that will kick in. In our case we used 'Plant' and 'Item value'. Not all fields in the PR can be used. For a full list of fields that can be used to determine the release startegy, see tcode se12 table CEBAN.
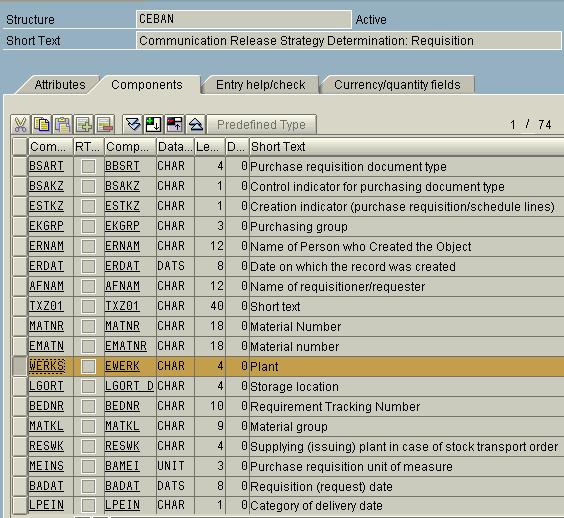
So the two fields that will be used is:
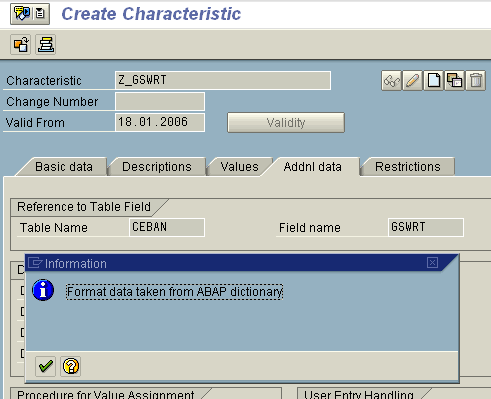
Field CEBAN-WERKS for Plant
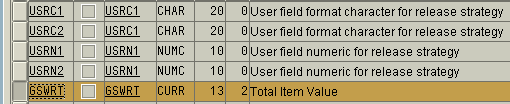
Field CEBAN-GSWRT for Item Value
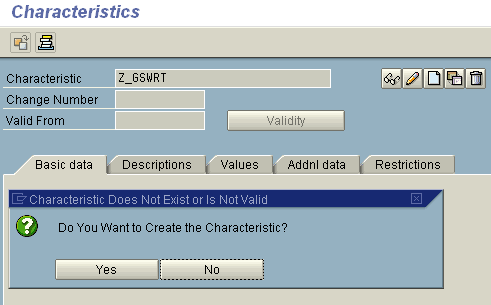
We need to create a characteristic for every field. tcode ct04
Any characteristic name can be used. Keep something descriptive to avoid confusion.
For Item Value -- lets create characteristic Z_GSWRT
First go to Additional Data tab and enter the table/field (and Enter)
Enter currency to be used in the Basic data tab.
Also select multiple values and Intervals allowed
The Intervals allowed will allow us to assign a range of values, example: If PR value is 0 - 1000 USD .....
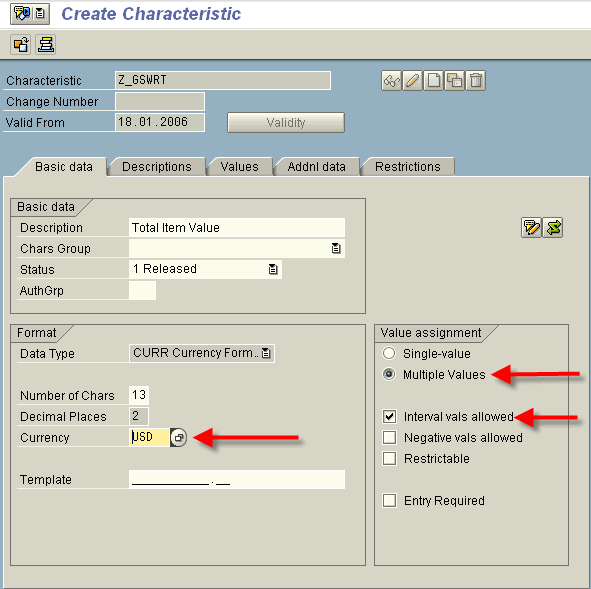
Save the characteristic
For Plant -- characteristic Z_WERKS
Again, the table/field name in Additional Data to enter table/field
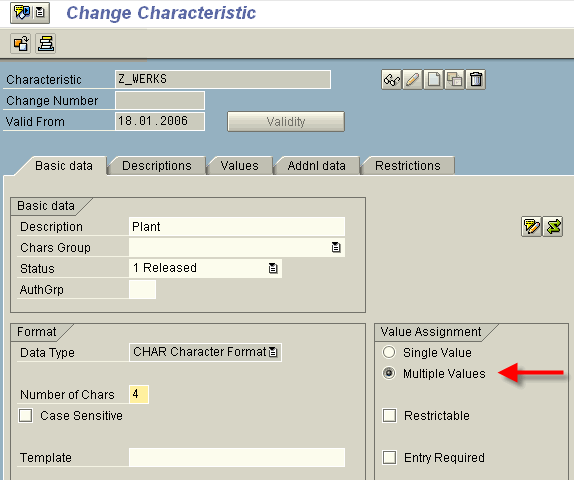
Again set multiple values and save the characteristic
The multiple values is to assign more than one plant to strategy, example: If PR for plant 3100 and plant 3600 is ...
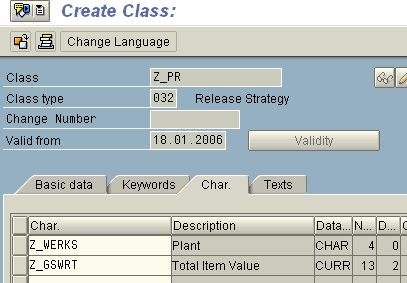
Create Class & link to characteristic
Create a class (simply to group the characteristics). Again any name can be used. Tcode CL01 -- Create Class. The Class Type must be 032.
Configure Release Procedures
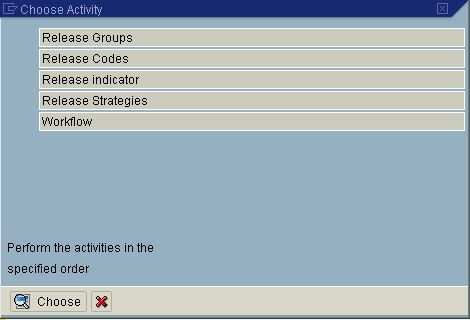
Above actions was all master data. We now need to do some configuration. Menu: IMG > Materials Management > Purchasing > Purchase Requisition > Release Procedure > Procedure with classification > Set up procedure -- (tcode OMGQ in older SAP versions)
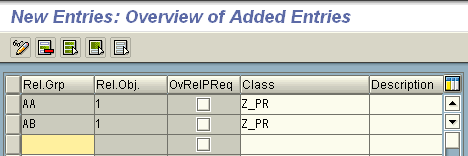
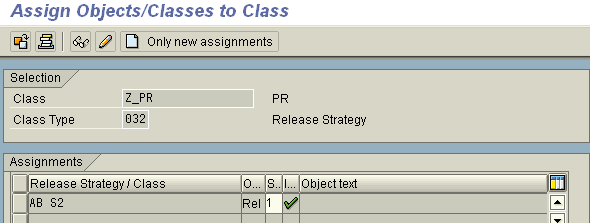
Create Release Groups & link to class
We have two groups to create AA and AB. We need to indicate the class we are working with, in out case Z_PR.
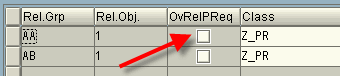
Create Release Codes
Create all the release code / group combinations. This is all the dots in diagram above. So we have 4.
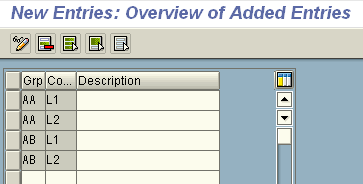
Later on, authorisation profiles will be linked to these code / group combinations.
Release Indicator
First we create the different statusses that the PR can be in throughout it lifecycle. Later on (below), we will be linking using these statusses. Here is the standard SAP indicators, wou probably wouldn't need to add any.

We will be using two of these -- X (Block) and 2 (Released)
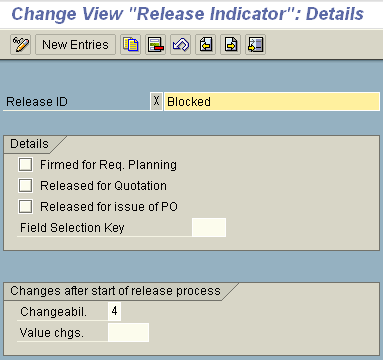
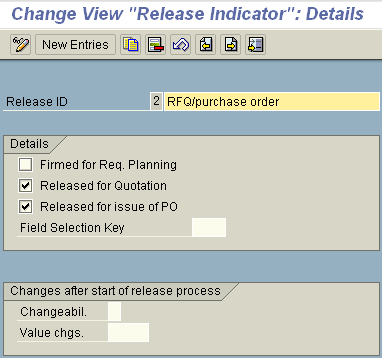
Under the Details section, you can indicate which documents can be created from this PR. For Indicator 2, one can create PO's and RFQ's.
With Field Selection you can define which fields can be changed. This is the same indicator that gets used with document type configuration to make some fields read only, mandatory, hidden.
Set up strategies - Strategy & Codes
Every line in our diagram above is a strategy. So We have three
Lets call them:
Group AA / Startegy S1 -- Code L1 (for plant 0001)
Group AA / Startegy S2 -- Code L1 & L2 (for plant 0001)
Group AA / Startegy S2 -- Code L1 & L2 (for plant 0002)
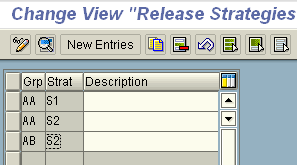
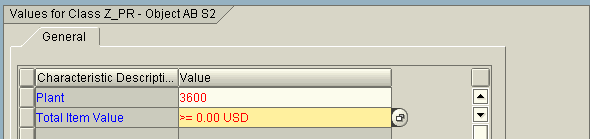
Here are the settings for AA / S2
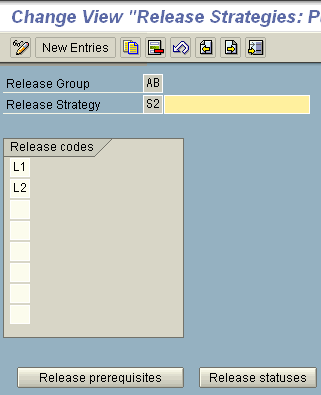
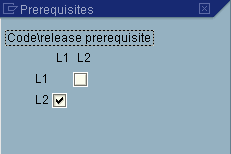
Set up strategies - Prerequisites
For every strategy, we need to define a release prerequisites. This indicate if one code need to take place before the other. In this case, level 2 (L2) can only take place if level 1 (L1) has been released.
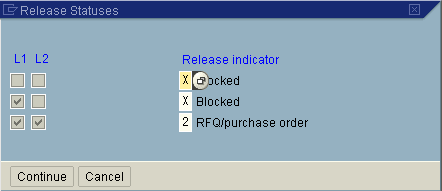
Set up strategies - Status
This is also done for every strategy. The screen is dependant on what groups were linked to the strategy as well as prerequisites that was set up. In this example:
- if nobody release it then PR is block.
- if L1 release the PR, the PR is still blocked
- if L1 and L2 release the PR, the PR can be converted to RFQ/PO
Out of interest, the reason why there is not a L2 only option is because of the setting in the prerequisites.
Set up strategies - Values for strategies
The values linked to strategies are master data (not configuration) and can be set in two places. Either within the configuration itself -- selecting the classification button

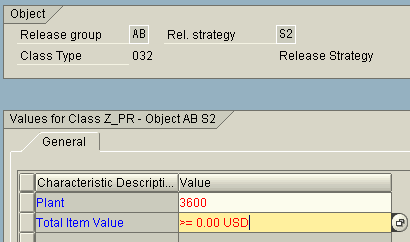
Or, in classification, example CL24N
Both methods work, the advantage of CL24N is that all the strategies can be viewed easier.
Set overall / item for doc type (PR only)
For Puchase Requisitions, there is an option to release either on item level or on document level. For PO / RFQ / Contracts, one can only release on header level. Back to the PR, it is highly recommended to use item release. This can be done in two places.
Firstly where the groups were created
On the document type configuration for PR
Config menu: Materials Management > Purchasing > PR > Define document types

Create and allocate authorisation profiles
In our example we will have three people releasing, so three profiles will need to be created. Authorisation profiles can be created using tcode PFCG.
Usage of PFCG are not being discussed here, but see below for relevant screen where the profile was created.

--------------- USING RELEASE PROCEDURES ---------------
Create a Purchase Requisition
Lets create a PR, and see if the release procedure kicks in. In our case we will create it for plant 3600 and any value. So we will expect Strategy AB / S2 to kick in.
Create PR -- me51n
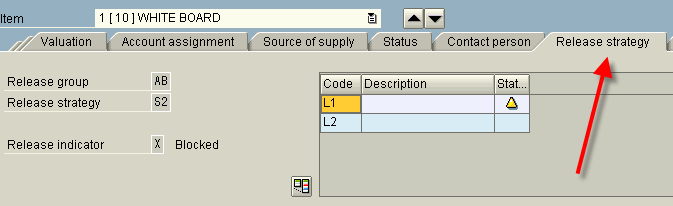
If no 'Release strategy' tab, then it didn't work. In this case all is fine. The user can see the Release Group (AB), Strategy (S2) and release indicator (X).
(SAVE)
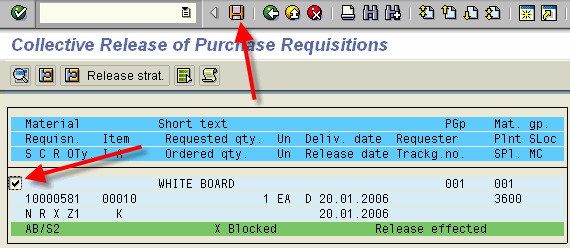
Release a Purchase Requisition
Releasing can be done per PR or collective. Lets' use the collective release. SAP Menu: Logistics > Material Management > Purchasing > Purchasing Requisition > Release > Collective Release -- ME55
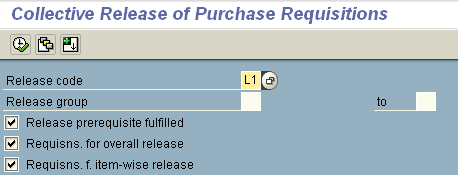
Select all the items to be released and then hit Save. You will see the status of the item change to the next Release Indicator.
This is the absolute basics of setting up Release Procedures for Purchase Requisitions. For more posts on Release Procedures, see index of posts.
SAP version used for this post: SAP ECC (ERP Central Component) 5.0
Subscribe to:
Posts (Atom)
